English

Assembly and Installation of Single Girder Overhead Cranes
Assembly and Installation of Single Girder Overhead Cranes
Date: 2026-03-26 Share:
Single girder overhead cranes work as flexible and affordable lifting options in places like workshops, warehouses, and factories. This full guide covers the procedures for single girder overhead crane installation. It includes site preparation, putting parts together, runway alignment, electrical connections, and careful testing. Teams follow these steps for how to install single girder overhead crane. This approach meets standards such as CMAA Specification 74. It also supports safe work and helps the equipment last longer.

What Are Single Girder Overhead Cranes and Why Proper Installation Matters
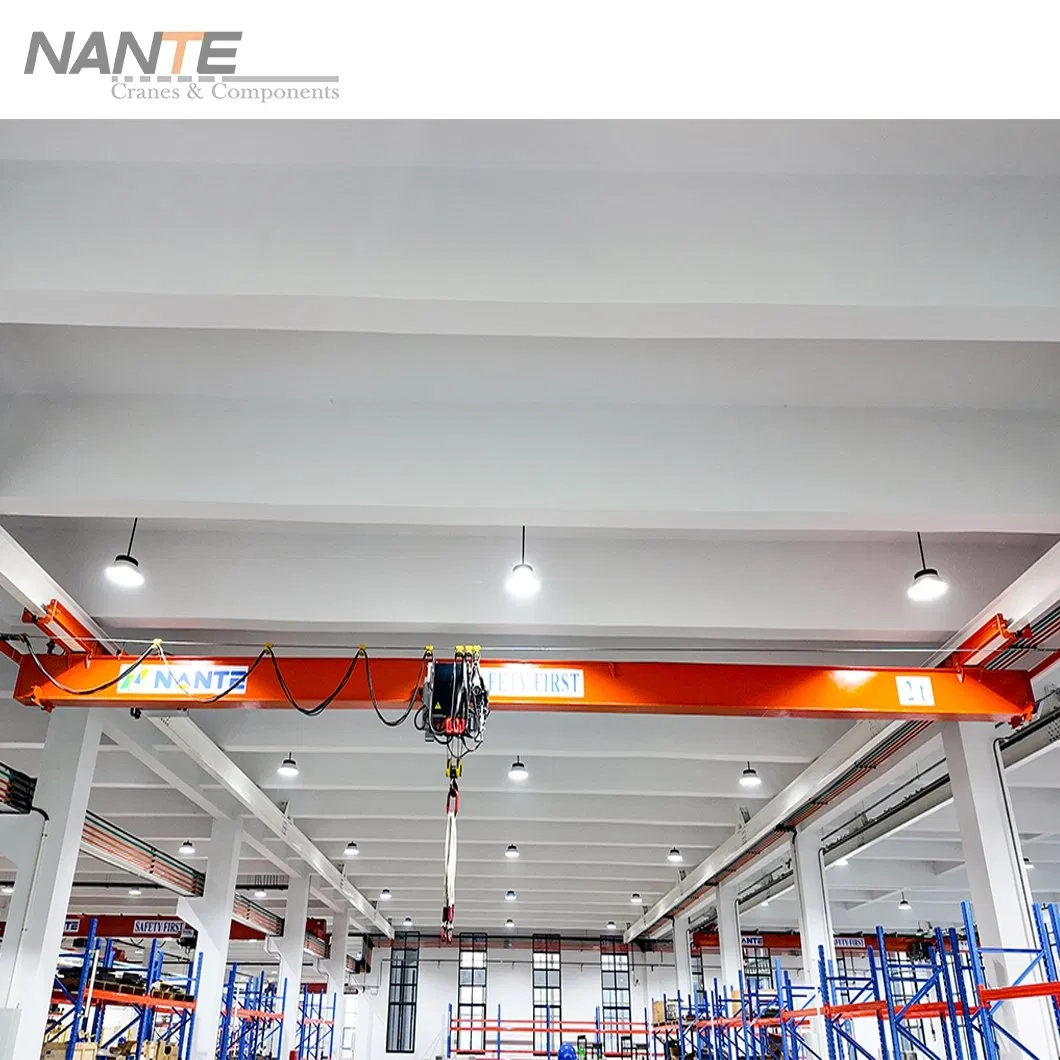
Single girder overhead cranes have one main bridge girder. This girder holds the hoist and trolley assembly. Important parts include the crane bridge girder, crane end trucks (end carriages), electric hoist, trolley system, and electrical control system. These cranes usually handle loads from 1 to 20 tons. Their spans can go up to 30 meters. Lifting heights range from 3 to 30 meters.
The design offers benefits. It has less weight. It needs lower headroom. It runs more quietly. Maintenance is simpler than double girder types. Good installation affects structural strength, vibration control, and long-term dependability. Poor setup causes misalignment. It leads to faster wear on parts. It raises energy use. It can even result in serious breakdowns. Strict single girder overhead crane installation rules follow CMAA guidelines. They improve overall function.
Pre-Installation Preparation for Single Girder Overhead Cranes
Good preparation cuts down risks. It makes the whole single girder overhead crane installation process smoother.
Site Inspection and Structural Requirements
Technicians carry out a detailed overhead crane installation site inspection. They check building columns, load-bearing ability, and clearance above. They make sure runway beams stay level and straight. They confirm the beams have enough strength for the crane weight plus the load. Enough net height stops the hook from hitting things during work.
Power Supply and Utility Preparation
Experts look over electrical needs for overhead crane installation. They check voltage match, amperage level, and grounding setup. They get conduits ready. They prepare disconnect switches. They ensure a steady power supply for electric overhead crane motors.
Tools and Equipment Needed for Crane Assembly
Installation crews gather key tools for overhead crane installation. These include torque wrenches, laser alignment tools, levels, lubricants, and measuring devices. They use forklifts, mobile cranes, scaffolding, and certified rigging. These help handle heavy pieces safely.
Main Components of a Single Girder Overhead Crane
Knowing single girder overhead crane components helps with correct assembly.
Crane Bridge Girder
The crane bridge girder makes up the main spanning part. It uses strong steel like S355. This keeps deflection low (usually 1/700 to 1/1000 of span per CMAA standards).
Crane End Trucks / End Carriages
Crane end trucks have wheel setups. These allow movement on the runway. Designs include heat-treated alloy wheels and drive systems. They provide balanced operation.
Electric Hoist
The electric hoist gives vertical lift. It uses a motor, wire rope or chain, drum, and built-in controls.
Trolley System
The trolley system moves the hoist sideways along the girder. It has accurate wheels and drive units.
Electrical Control System
The electrical control system includes IP-rated panels, festoon cables, limit switches, and pendant or remote controls. These ensure safe use.
Step-by-Step Assembly Process of Single Girder Overhead Cranes
This main part explains how to assemble single girder overhead crane in clear order.
Unpacking and Inspecting Crane Components
Teams unpack parts with care. They use an overhead crane component inspection checklist. They look for damage from shipping. They check if everything is there. They confirm details match the papers.
Installing Crane End Trucks on Both Sides of the Girder
Installers line up crane end trucks carefully at girder ends. They bolt them tight. They check for squareness. They tighten fasteners to manufacturer specs with torque.
Mounting the Crane Bridge Girder
Cranes lift the assembled crane bridge girder using certified rigging. Workers place it on runway beams or supports. They keep it level.
Installing the Electric Hoist on the Girder
Technicians handle electric hoist installation on overhead crane. They fix it to trolley rails. They align the wheels. They make early power links.
Installing the Trolley System
Installers set the trolley on girder rails. They connect it to the hoist. They add lubrication. They test it for smooth and aligned movement.
Installing the Runway Rail and Crane Travel Mechanism
Accurate runway setup ensures steady crane travel.
Runway Beam Installation
Teams fix runway beams solidly to the building structure. They use proper supports.
Rail Alignment and Leveling
Installers use laser tools for crane rail alignment method. They follow CMAA tolerances: span ±3/16″ to ±3/8″ (depending on span), straightness ±3/8″, elevation ±3/8″, with maximum change 1/4″ in 20 ft. They keep rails parallel. They add expansion joints.
Fixing Rails with Bolts or Welding
Workers attach rails using clips, bolts, or welding. They make sure joint gaps stay under 1/16 inch. They keep surfaces even.
Electrical Installation for Single Girder Overhead Cranes
Proper electrical setup supports reliable crane work.
Installing the Festoon Cable System
Teams set up festoon cable system installation. They use C-tracks and flat cables. This delivers power safely to moving parts.
Wiring the Hoist and Travel Motors
Electricians connect hoist and travel motors. They follow diagrams. They check grounding. They add inverters for smooth control.
Installing Limit Switches and Control Panels
Installers place limit switches and control panels. Then they test every function carefully.
Testing and Commissioning After Crane Installation
Full testing verifies the system works well.
Static Load Test
Teams apply 125% rated load in a static way. They measure deflection (≤ span/600–1000). They confirm brakes hold properly.
Dynamic Load Test
Operators run hoist, trolley, and bridge moves under load. They check brakes, controls, and stability.
Final Safety Inspection
Inspectors review alignments, fasteners, electrical condition, and safety features. They approve operation only after checks.
Safety Precautions During Single Girder Overhead Crane Installation
Safety stays the top priority in overhead crane installation safety guidelines.
Personal Protective Equipment (PPE)
Workers wear hard hats, safety glasses, gloves, harnesses, and steel-toed boots all the time.
Electrical Safety Measures
Teams use lockout/tagout rules. They cut power during electrical jobs.
Safe Lifting During Crane Assembly
Installers rely on certified rigging. They stay clear of areas under hanging loads. They plan lifts with multiple people.
Common Installation Mistakes to Avoid
Teams avoid overhead crane installation mistakes. These include runway misalignment (which causes skew, wheel wear, or derailment). They prevent loose bolt torquing (which leads to instability). They fix poor electrical connections (which risk shocks or breakdowns). They do not skip inspections or load tests (which miss problems).
How Long Does It Take to Install a Single Girder Overhead Crane?
Overhead crane installation time varies with crane size, site readiness, custom features, and crew skill. Standard single girder units often need several days to 1–2 weeks. This covers full assembly, alignment, electrical tasks, and commissioning.
Frequently Asked Questions (FAQ)
How to install a single girder overhead crane?
Start with site preparation. Assemble parts in order. Align runways carefully. Finish electrical connections. Do load tests as described.
What safety standards apply to crane installation?
CMAA Specification 74, OSHA rules, and related codes control design, erection, and operation.
How long does crane installation take?
It usually lasts days to 1–2 weeks. Project details affect the time.
What is the cost of installing an overhead crane?
Costs change with size, site difficulty, and services. Professional advice gives exact figures.
Ready to Install Your Single Girder Overhead Crane? Contact Nante Crane Today
Nante Crane specializes in high-quality single girder overhead cranes and crane components. Designs meet international standards like FEM and CMAA. Features include compact girders, efficient gear motors, reliable festoon systems, and full services from design to installation support. Nante Crane offers custom, strong lifting solutions for many uses. Contact us today for expert help on your project.